Friday, December 20, 2019

Alchemist Conversion (WIP)

Alchemist (WIP)

This WIP was actually the first I started about a year and a half ago.  I still haven't painted the miniature but I wanted to get the WIP out finally.  Because of the age, the photo's aren't quite as good quality as the other recent posts because I got a new phone since taking these.


While on Pinterest I found some great model sets from Northstar and Osprey, one of which is Frostgrave Cultists which I thought would be good bases for characters in D&D. 


My first character I made from the set is an alchemist inspired by a set of arms holding pistols from the GW dispossessed dwarves (Not sure which set as they came with a lot of sprues from eBay).

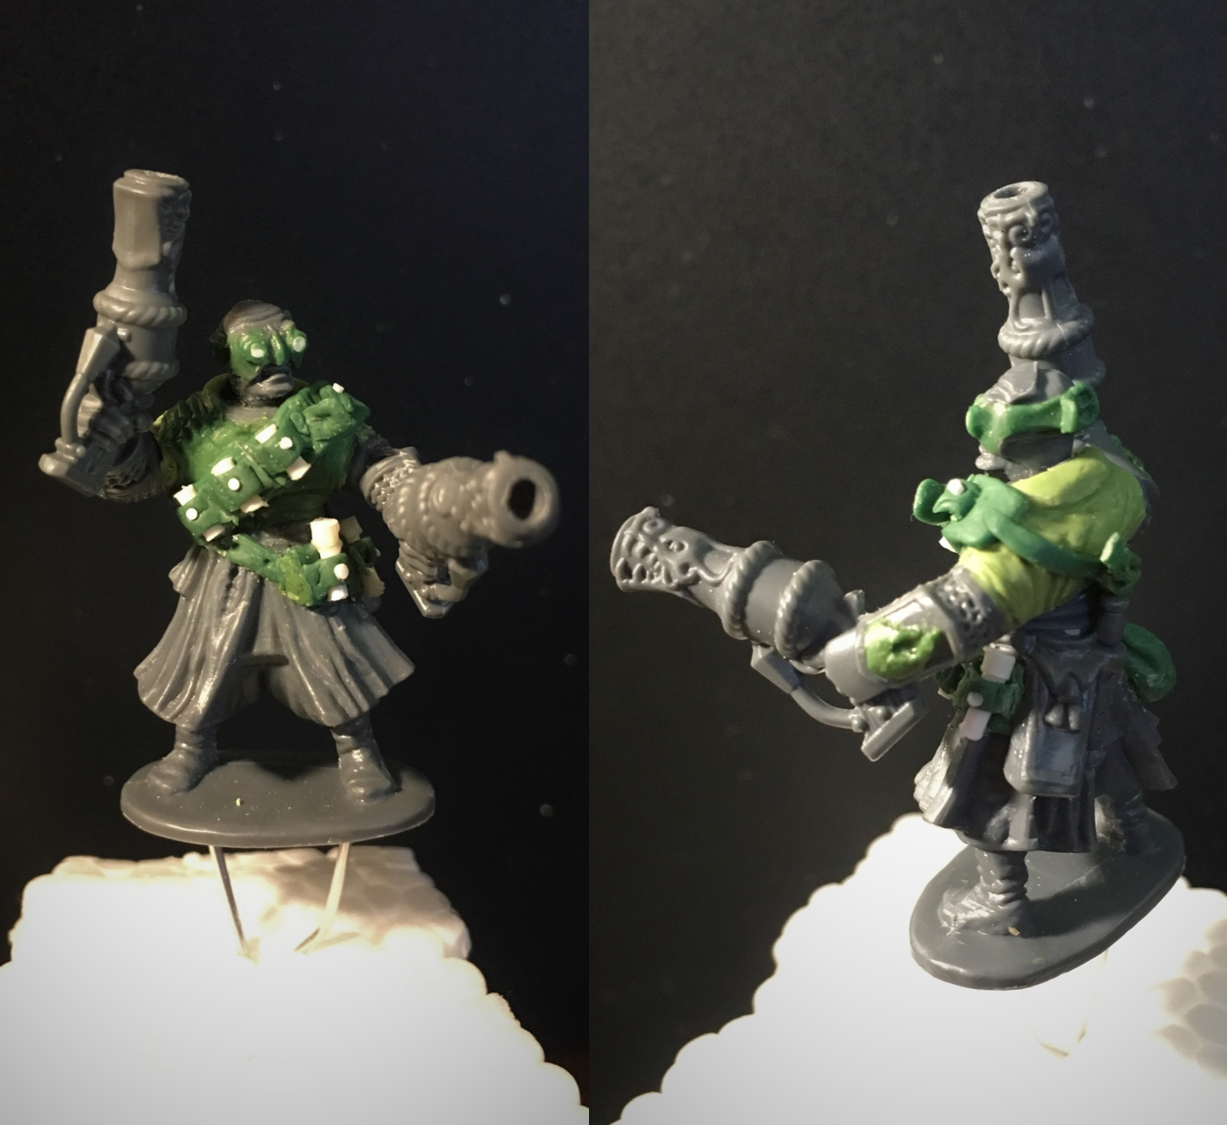
First the arms were attached to the body and head from the cultists.  The arms looked way too bulky so I had to add some size to the shoulders, luckily the length of the dwarf arms work with the cultist bodies.  Then I thought it would be cool to give him some goggles (plus it would avoid me having to paint eyes). The guns looked so much better once I drilled into the ends to make barrels.


I realised that the robed top didn’t look great, really I should have used the other bodies which had leather armour but as I had already started it was too late now.  I cut away the robed chest and modeled what hopefully looks like leather over the top.  With the leftover greenstuff I made a bag to put on his hip.  The other pouch and knife came from the cultist sprue.


Next I wanted to give him a bandolier filled with alchemical canisters.  I sculpted out the bandolier below and added cut pieces of plasticard rods as the canisters.  I used larger pieces as caps, going for a pipebomb kind of look.  Now, I think a better look would have been to use two smaller pieces on one end on top of each other to make them look more like bottles with cork stoppers, and add additional straps at the bottom to hold the bottles into the bandolier.  I have since learnt how to make straight and even thickness straps which would look much better. 

I waited until the greenstuff had mostly set and then went on to attach to the miniature.  Though I had made the straps extra long so I could shorten to the desired length, at this point I realised that the bandolier was much longer than could fit on the model.  Therefore, I decided to cut the bandolier in two and make a hip bandolier as well.


I've already restarted painting him twice so it will be awhile before he is complete.

Wednesday, December 18, 2019

Ash in Belfry's Armour of the Dead

Ash in Belfry's Armour of the Dead

My last post was of my character in my current D&D campaign, Ash the Fire Genasi Warmage.  As I was making that, I was also working on another version of him.  In the campaign, the DM made a homebrew Spell called Belfry's Armour of the Dead.  It used a corpses worth of bones and creates magical armour out of the bones for the spellcaster, like a beefed-up Mage Armour.  The idea was so cool that I wanted to make a mini of my character wearing that armour.


The spell causes the bones to open up and encase the various body parts, not necessarily where they would normally go, such as femurs to legs, but any bone to anywhere it covers.  It took a very long time to sculpt as I could only work on a few parts at a time so I didn't accidentally smudge a part.

The body is a Ghost Archipelago Crewman and the arms are Frostgrave Barbarians.  The ribs on the front and back look sculpted because of the colour but they were actually made form molds of the Games Workshop Skeleton Warriors body's, which I cut into two and hollowed out to fit on.  The spike on the shoulder pad and the horns on top of the shoulder are from GW's Tzaangors.  The skull on the shoulder is from a shield I think, that way it would have the flattened out look I was going for.

I had sculpted a head with a skull helmet but once I started painting it, I really hated the way it turned out so I went with the same head I had used for the other mini from the Frostgrave Wizards sprue.  I don't think the head goes well with the body so I may replace it in the future.

An issue I have with this miniature is that he doesn't look like an adventurer, he's missing his bag of holding, cloak, wand, etc...


Paintwise, I followed the basic tutorial for GW's Skeletons for the bone, Base Zandri Dust, heavy wash with Agrax Earthshade, highlighted with Ushabti Bone mixed with Corax White.  The right hand and left pointing finger are coloured to represent two spells that get used a lot, Bigby's Hand and Disintegrate.  The glowing isn't as good as I hoped, I think I rushed them slightly.

For the head, the hair was done based on a tutorial for fire and the eyes were Trollslayer Orange.  I had used a dark red for the eyes on the previous mini but I feel the orange makes them look more gllike they glowed.


All in all, it's really cool to have some miniatures that represent fun stuff from a campaign.  I definitely want to do this for more characters and have different miniatures as they progress.  For this character, the armour can be made form any bones, so I would like to repeat this sculpt but with dragon bones as the inspiration, showing an evolution of the character.

Monday, December 16, 2019

Ash (Fire Genasi Warmage)

 Ash (Fire Genasi Warmage)

My only D&D campaign at the moment is a homebrew continuing after Waterdeep: Dragon heist and I really wanted to have a good mini for it.  Not only a good mini, but one that looked AS CLOSE AS POSSIBLE to what my character looks like, magic items and all.


So here is my Fire Genasi Warmage.  He is a hermit who was living in the old workshop of an ancient wizard after running away from home the night at a young age because he set the family home ablaze.
One of the key concepts here was the piecemeal way adventurers must look to begin with.  We all want our characters to look cool and/or stylish, but the fact of the matter is that the Cloak of Protection you just picked up was made for someone else and probably doesn't match your Noir aesthetic, but you pretend it does so you can get that sweet +1 to AC at level 2.  Anyway, so to represent this, I made sure my character would have the three magic items he has kept for a while, a Wand of the Warmage +1, a Cloak of Protection, and a Bag of Holding.

The basis of the model is Ghost Archipelago Crewmen body (weird sash cut away), with Frostgrave Barbarian arms, and with a head, cape, and wand from the Frostgrave Wizards set (I swear I'm not sponsored by Frostgrave or anything, I just really like the utility and compatibility of the box sets so I got them all...).  As someone away from society from most of his life, he doesn't have much social grace, but has a decent constitution from living off the land, hence the bulkier arms and plain clothes.


I based the Cloak of Protection off the image in the DMG, adding a hood and shawl to the cape.  I forgot about the coloured trim until it came to painting, so I didn't sculpt it with that in mind.  I also wish I had thinned the edge at the base of the cloak, it looks really weird after painted.  I tried but couldn't do a shield clasp I was satisfied so I left it out.  The Bag of Holding was based of the DMG image too.


When it came to painting, I followed the main sources as much as possible, blue and gold for the cloak, red and blue for the bag of holding and purple for the vest (Because Xanathar said that Warmages should wear purple in his Guide to Everything). 


The Bag of Holding intentionally looks different because I had an idea where a Bag of Holding might start to alter its appearance based on what it most often holds.  In this case, the bag was most often used to hold bones and body parts of monsters so it shifted to be more skull-like.  Heavily inspired by both the Bag of Holding and Bag of Devouring.

Sunday, December 15, 2019

The Revenant

The Revenant

Continuing with the characters for the dark DnD setting, I converted a miniature that I had been wanting to use for a while to make a revenant.  First, here is the finished product:


I converted this miniature from a Privateer Press Monolith bearer (Link).  I think the basis of the original miniature is really cool, but the monolith is too obnoxious to allow it to be feasible as anything else. 


Removing the monolith was a very long process that involved a lot of sawing, cutting, clipping and filing.  I tried to keep the left arm but it was too destroyed.  I replaced it with the left arm from the Frostgrave Barbarian set and sculpted the left sleeve and gauntlet.  I also had to sculpt everywhere the monolith had been on the back to continue the robes. I didn't do a very good job at smoothing them out (Filing by hand made little progress) and I think this hindered the paint job on the back side.  I think I need to invest in a dremel to make these kind of conversions easier.

Paintwise, the colour scheme came from an experiment in theory.  I had read that to make a scheme more believable, the shadows should have cooler tones and the highlights should had warmer tones.  So I thought purple would be a good starting point as it would be easy to make warmer and cooler by adding red and blue colours respectively.  A base of dark purple with a heavy blue wash led on to a slow highlight with dilute purply red.  I think it looks cool but I think the addition of glowing eyes would have made it a lot better.

Tuesday, December 10, 2019

Korvus MD (Aarakocra Grave Cleric)

Korvus MD


For my main DnD campaign, a friend is playing as a Aarakocra Grave Cleric with a plague doctor theme.  The character uses the plague doctor mask to hide his beak, which I think is genius!

He has access to 3D printers so he designed a mini on Hero Forge (https://www.heroforge.com/) and printed it himself.  However, they didn't have the hat that he wanted, so I offered to sculpt his character a hat and paint the whole thing.

Here is the finished article:


The hat was made out of two pieces of plasticard cut out using a Cricut.  A Cricut is a 2D cutting and writing machine that is used mainly by people for fabric and graphic design.  My wife got one last Christmas and I worked out that I could cut shapes out of plasticard with it!  This made it really easy to get the shapes I needed, a ring and a disc. 

I filed away the top of the plague mask and laid on the disk with superglue, which I had measured out to fit beforehand.  I then superglued a small plasticard tube to get the height and act as a base for the greenstuff.  Then came the tip of the hat.  I greenstuffed around the plasticard tube several times, each adding a little bit and allowing to set so I didn't bugger it up by trying too much at the same time.  I went over the intended shape so I could use a rounded file to take away until I got the concave shape I wanted.


 For the paint job I mainly followed a tutorial on paint black cloth, briefly you start with black, wash with a dark blue, and slowly add a bluish grey to highlight.  The symbol on the cape is of his diety and was free handed, which was pretty hard.  I marked out the whole thing with a very dilute gold so I could get the proportions right, then after making the first layer, I cleaned it up using the dark grey.  I should have blended the touchups better but I was so worried about messing up the symbol further that I thought it best just to quit while I was ahead.


All in all, I'm really happy with it and it was a relatively quick paint.


Monday, December 9, 2019

The Craftsmen

The Craftsmen

Another WIP.  I started making a very dark DnD one-shot which involved a bunch of Craftsmen that get lost in the catacombs under a city, facing extreme adversity, leading to them becoming heroes (Lvl 1) or dying along the way.  I tried to sculpt some of the characters so here they are, waiting to get painted:


 From left to right; The Hunchback, The Smith, The Veteran and The Woodsman


The Hunchback 


Mainly made from the Frostgrave Cultists kit, including a milliput copy of one of the bodies.  In a bag of random bits, I got a set of heads that had no neck whatsoever, after playing around I decided to try and make a hunchback by mounting the base of the skull onto where the neck would go and sculpting the back out for his hunch. 

Being a drifter, I liked the idea of him carrying everything with him he needed so I sculpted him a couple of bags and a dead rabbit.  These were sculpted onto the belt, which was made by twisting wire around itself, aiming for it to look like rope.  I was trying different ways of give straps for bags and whatnot, so the one for the satchel was simply greenstuff.


The Smith

The Smith uses the same base body as the Hunchback but uses Frostgrave Barbarian arms and a GW dwarf head with the beard cut off (Too dwarf-y).  I wanted to see how different I could make some miniatures using the same base, so I cut off parts of the robes to make the legs look like trousers and filled in the back (which I think didn't work well at all). 

I also sculpted a leather apron, which I wish I had included a tool belt with, the beard, which was fun!, and the backpack.  The straps of the backpack is plastic cord for beadwork, cut a little thinner.  It works but I think they are too bulky.  I also wish I had replaced the oversized hammer head with something more reasonable.


The Veteran

The Veteran will escort the PC's at least part of the way.  The body and head are Frostgrave Guards whereas the arms are Frostgrave Barbarians.  The right hand and sword are actually from the GW Skeletons set as I have an idea for a cult where a necromancer gives amputees new skeletal limbs to gain followers.

The sheaths are made from plasticard with greenstuff and a symbol from a standard to add flavour.  The strap is a 1/16 inch ribbon, trying once again to experiment with different materials for straps.  This is probably my favourite for an easy one.


The Woodsman

The last and my least favourite, the goal here was to try and convert the weird robes around the legs into a leather long coat.  The sculpt was midly susccessful, but I think the bulk behind the trousers and the transitions hinder it.

The quiver is in a strange place because it is meant to be scavenged and the strap looks messy because I had 1/8 inch ribbon that I cut in half, definitely not as good as getting actual 1/16 ribbon.


All in all, these were pretty fun to make, besides the woodsman, but I think I won't be making the milliput copies any more.  They are slightly cheaper but they come with a lot of hassle.